How to integrate certification and e-signature in my application?
Purpose
The purpose of this document is to provide Woleet customers with an overview of how they can certify their documents or integrate e-signature in their applications using the Woleet API and an instance of Woleet.ID Server (managed or on-premise).
The document first explains the basic principles of certification and e-signature, then describe the various interactions between involved software, namely:
- the customer application (backend & frontend)
- the Woleet.ID Server instance (usually hosted in the customer infrastructure and accessible through a Web UI and an API)
- the Woleet platform (accessible through the Woleet API)
Certification
Process
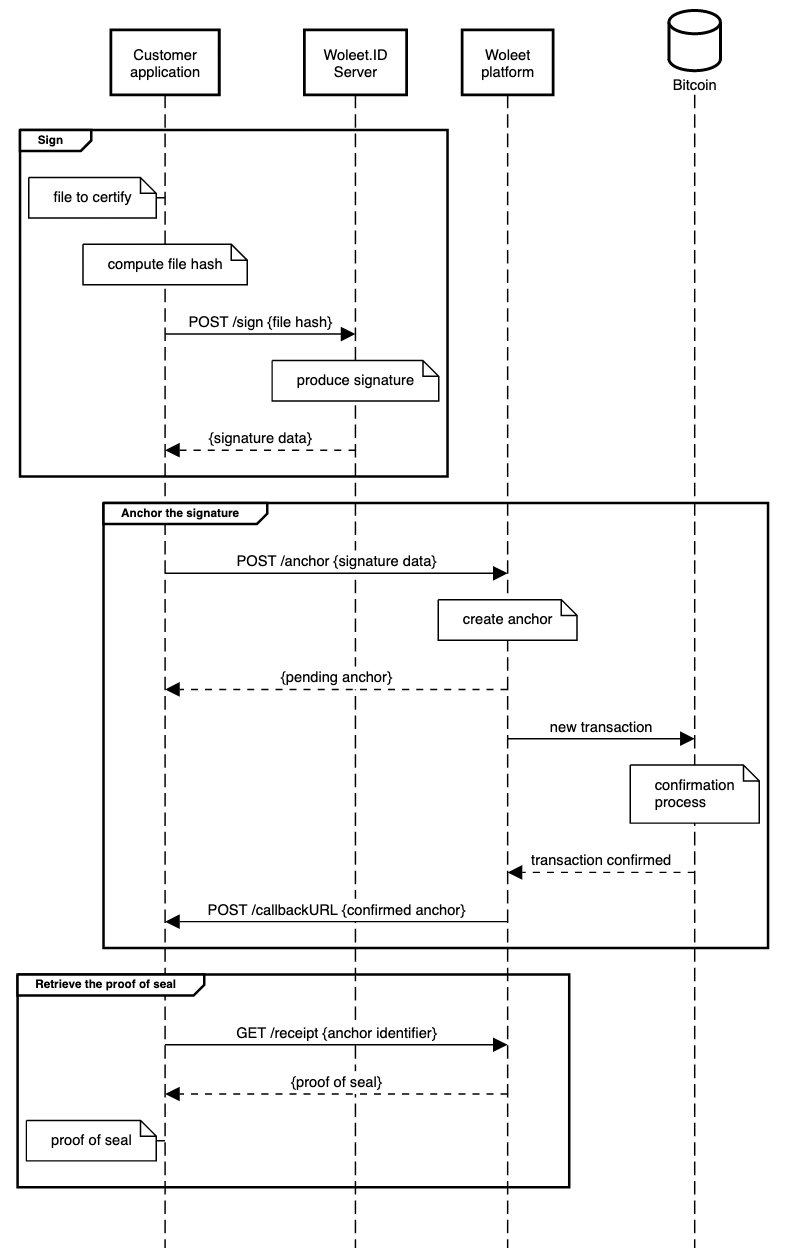
To certify a document using Woleet, the customer application needs to:
- compute the digital fingerprint of the document (its SHA256 hash)
- sign it using a signing key controlled by the customer organization and linked to the customer organization’s identity (using the Woleet.ID Server API)
- ask for a proof of seal (using the Woleet API)
- retrieve the proof of seal (using the Woleet API)
At the end of the process, the proof of seal produced by the Woleet API contains:
- the signature data:
- the digital fingerprint of the document (ie. the signed data)
- the bitcoin address of the customer organization (ie. the public part of the sealer’s key)
- the signature (compatible with Bitcoin’s message signature standard)
- the proof of existence of the signature: this is a cryptographic proof linking the signature to a timestamped transaction on the Bitcoin blockchain
- the URL of the identity server (ie. the identity URL of the Woleet.ID Server instance) allowing to verify the identity of the sealer and the control/ownership of the signature key by the identity server
For the signature to be verifiable independently from Woleet, it is mandatory to have the proof of the seal and the signed document (we recommend to always store the proof next to the signed document). However, even if the proof is not available, it can be retrieved from the digital fingerprint of the document using the Woleet API, provided that it was created as a "public" proof (which is the case by default).
Sequence diagram

Tools
Woleet customers can use two open source tools to certify their documents. The full certification process (from step 1 to 4) is covered by both tools, so no coding is required.
woleet-cli
woleet-cli is a command line tool (for Linux, Windows, macOS) allowing to automatically certify all the files present in a given directory. It can be installed on a backend server and automated using a crontab.
More info at https://doc.woleet.io/docs/woleet-cli.
ProofKeeper
ProofKeeper is a desktop application (for Linux, Windows or macOS) providing an UI over woleet-cli. It can be installed on desktop computers and is self-automated.
More info at https://doc.woleet.io/docs/woleet-proofkeeper.
e-signature
Process
e-signature is similar to certification, except that the signing key must be controlled by an individual and linked to his/her identity (note that the individual can also be a moral person).
It is important to understand that to be legally bound, a e-signature should never be produced on behalf of an individual without authenticating him/her, allowing him/her to review the document and asking for his/her consent to sign. Thus, when a customer application controls the key of an individual, it must be able to prove that it authenticated the individual, allowed him/her to review the document and collected his/her consent to sign before signing using the key on his/her behalf.
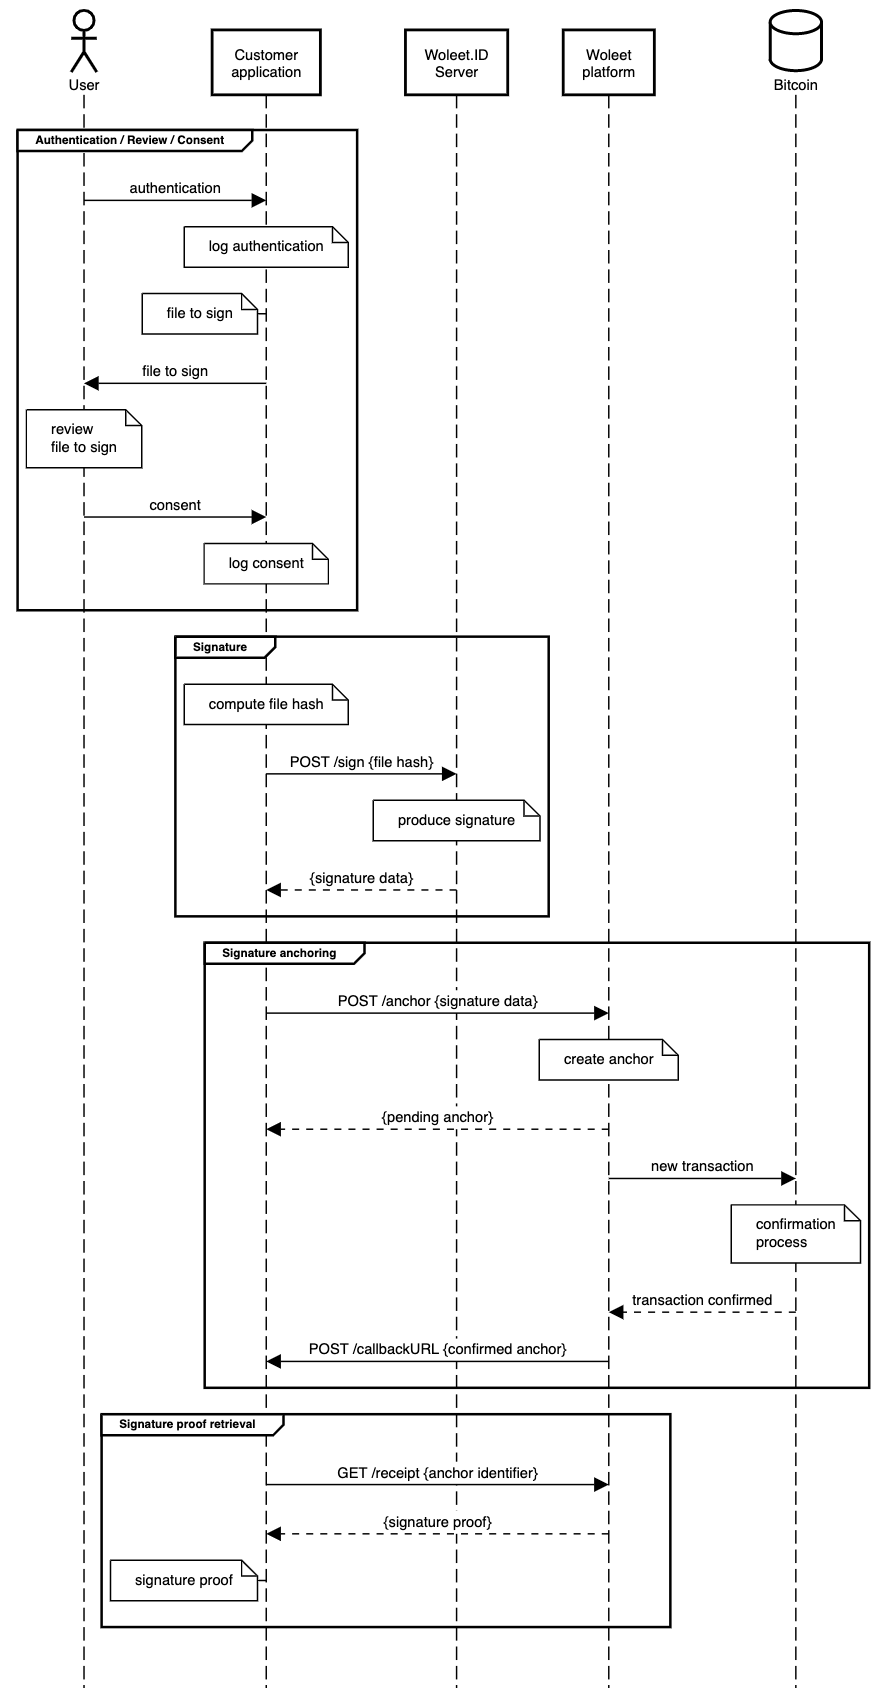
To sign a document on behalf of an individual using Woleet, the customer application needs to:
- authenticate the individual
- allow the individual to review the document
- collect the individual consent to sign
- compute the digital fingerprint of the document (its SHA256 hash)
- sign it using a signing key controlled or verified by the customer organization and linked to the individual’s identity (using the Woleet.ID Server API)
- ask for a proof of signature (using the Woleet API)
- retrieve the proof of signature (using the Woleet API)
The steps 1, 2 and 3 can be challenging and costly to implement, since it usually requires to implement a complex workflow, like:
- sending emails and/or SMS containing authentication challenges to individuals
- providing individuals with UI tools allowing them to review the document and give their consent to sign
- logging the various events and building audit trail proving that the workflow was performed correctly
Furthermore, if the customer application is a stakeholder to the process, there is a security risk, as it is still technically possible for the customer application to sign on behalf of an individual without his/her authorization (since it controls both the signing key and the audit trail).
To solve this problem, the Woleet API provides signature requests: a signature request implements this complete workflow (from step 1 to 7) with high customization capabilities and allows to use Woleet as a third-party trust provider, responsible for authenticating the individual and controlling his/her signature key.
At the end of the process, the proof of signature produced by the Woleet API contains:
- the signature data:
- the digital fingerprint of the document (ie. the signed data)
- the bitcoin address of the individual (ie. the public part of the signer’s key)
- the signature (compatible with Bitcoin’s message signature standard)
- the proof of existence of the signature: this is a cryptographic proof linking the signature to a timestamped transaction on the Bitcoin blockchain
- the URL of the identity server (ie. the identity URL of the Woleet.ID Server instance) allowing to verify the identity of the signer and the control/ownership of the signature key by the identity server
Sequence diagram

Signature Request
Using signature requests is the easiest way to integrate e-signature into a customer application.
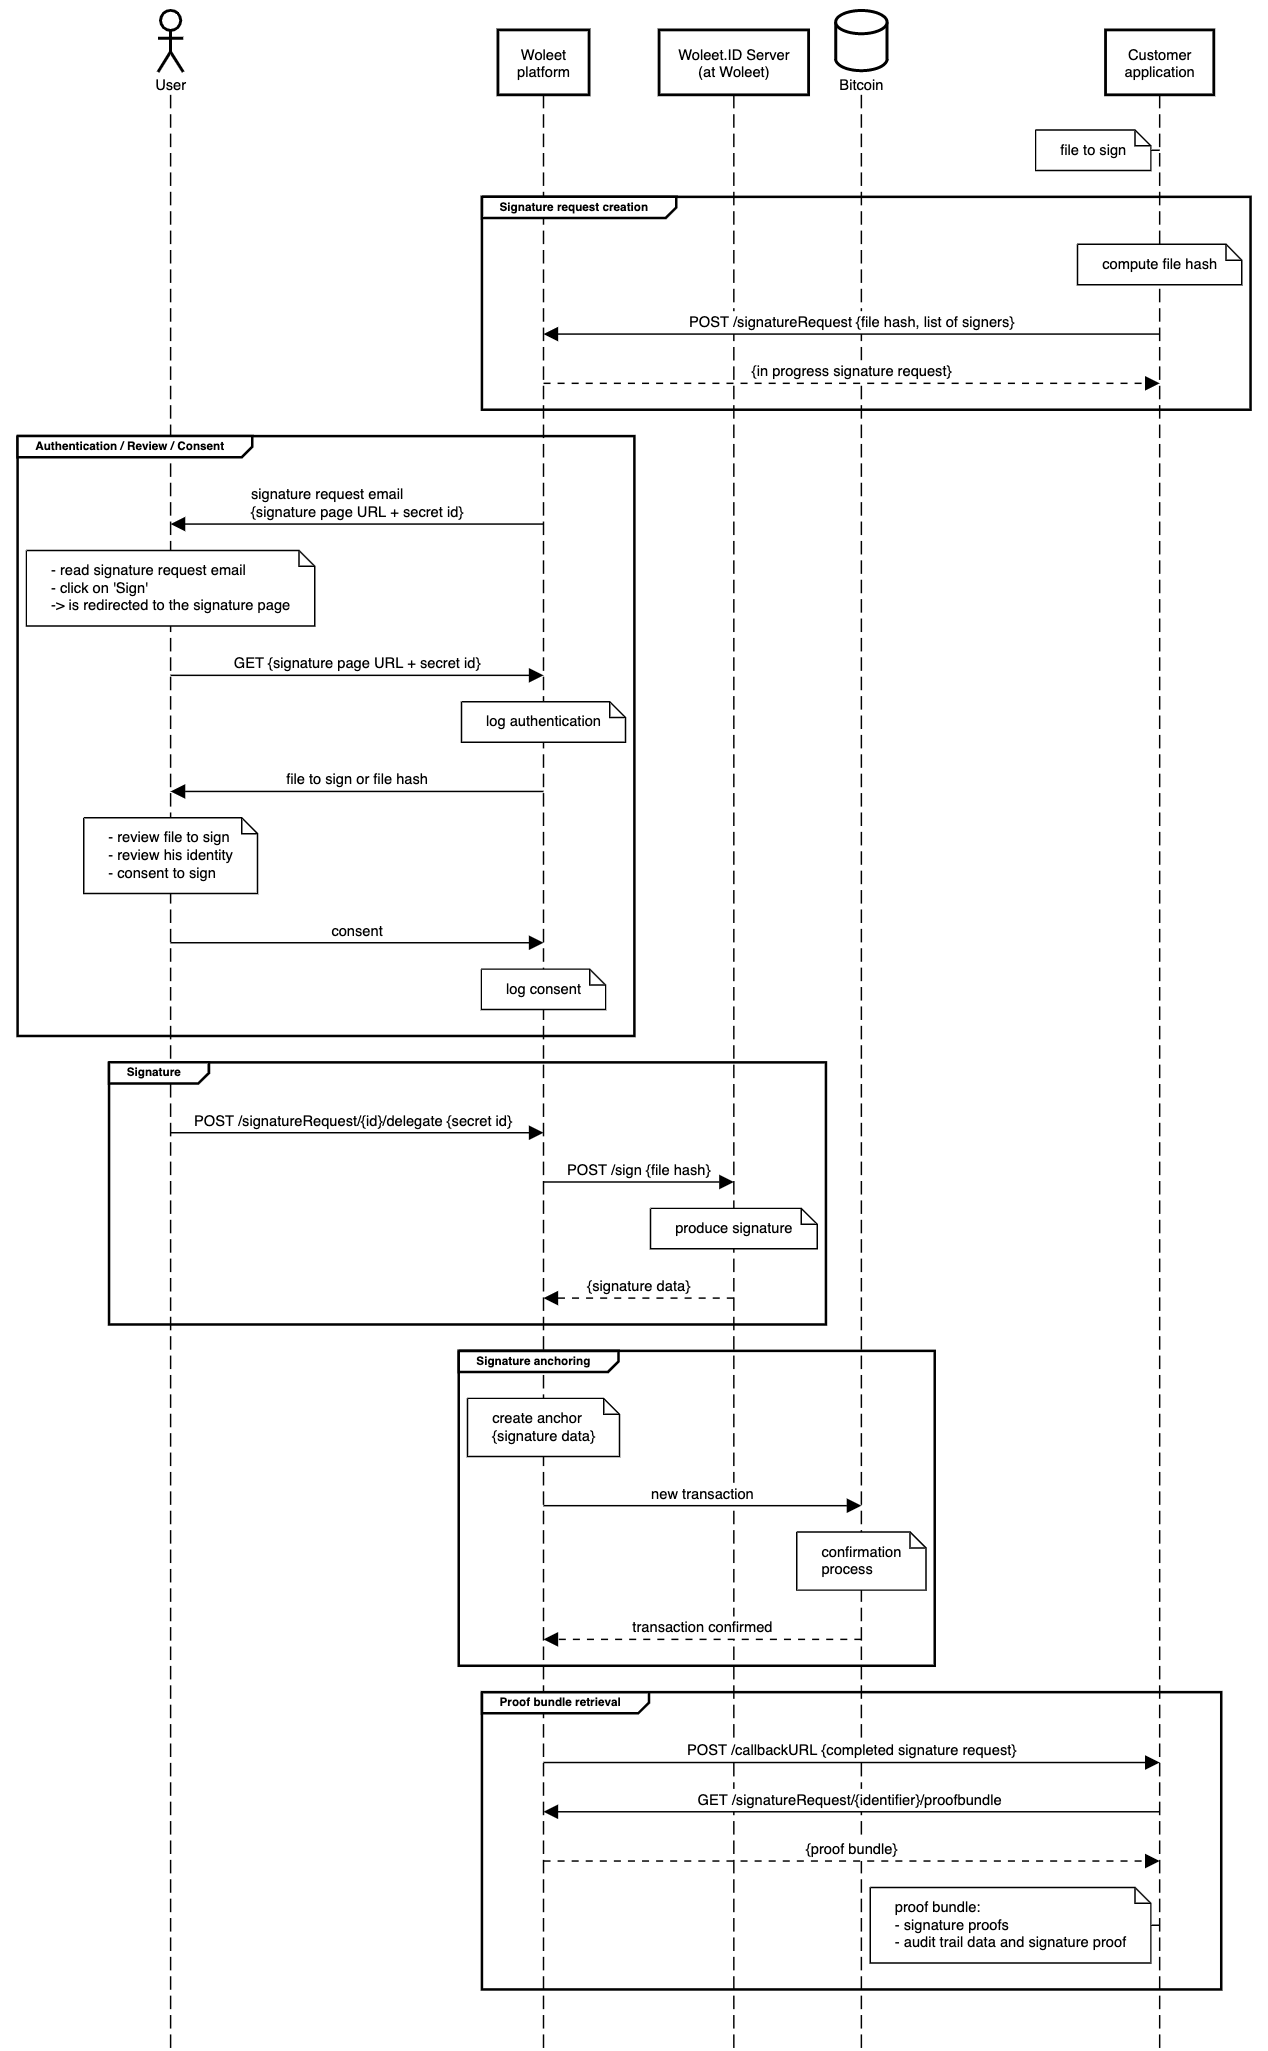
The full e-signature process (from step 1 to 7) is covered by signature requests:
- signature request emails are automatically sent to signers (all emails can be fully customized or deactivated)
- signers are redirected to a default signature web page allowing to review the document and consent to sign (this web page can be partially customized or replaced by a customer specific web page)
- signers authentication is performed by the Woleet platform (double authentication using SMS OTP is available)
- signers key management is performed by the Woleet platform by default (but can also be performed by a customer specific Woleet.ID Server instance)
- an audit trail containing all process events is automatically built and certified by Woleet at the end of the signature process
- all the signature proofs, plus the audit trail and its certification proof are sent to all parties at the end of the signature process in a human readable PDF document (the signature attestation document)
When using signature requests, no coding is required except for the creation of the signature request, which is done using a single API call. Retrieving the proof bundle is not mandatory, as it is included in the signature attestation document.
Sequence diagram

Updated almost 4 years ago
